Remove write-protection from SD cards and USB memory drives
Certain SD cards and USB memory drives come with write protection switches. When they are enabled, files already stored on the device are prevented from being deleted and no new files can be written on the device. The main purpose is to stop you from formatting your SD card or USB memory drive by accident.
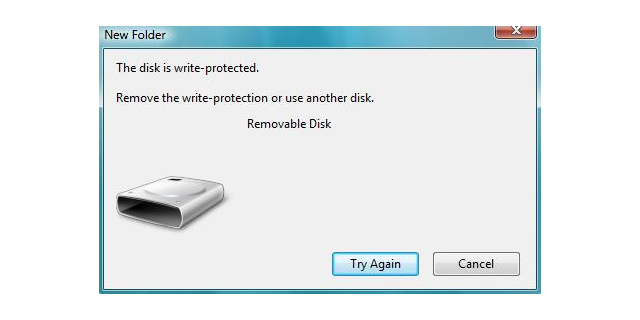
On occasions, you might discover that a SD card or a USB memory drive will simply refuse to format. Windows will then tell you that the respective device is write protected. This may happen even if there is no switch, or even if the switch is set correctly and allows the device to be written onto.
Usually, you are allowed to read the files that are already stored on the device, but without being able to delete them. Sometimes, these files seem to delete just fine. However, the next time you check, the files are still there.
Below you can find several methods you can use in order to format the drives and successfully remove the write protection. However, you should keep present that there is no guarantee that they will work. Sometimes, your USB memory drives and SD cards might be corrupt or even physically broken. In such cases, no low-level formatting tool or utility will be able to make it work again. If that is your case, the only available solution is to buy a new SD card or USB memory drive.
In all Windows versions (from XP onwards), all you have to do is run Regedit.exe (when you search ‘regedit’, the program will more than likely show on the top of the list).
Next you have to Navigate to this key: Computer\HKEY_LOCAL_MACHINE\SYSTEM\ and find CurrentControlSet\Control\StorageDevicePolicies.
Once there, just Double click on WriteProtect (you will find it in the right-hand Regedit.exe pane). Then modify the Value data (change it from 1 to 0) and save the change by clicking OK. Now you are almost done. Close Regedit and reboot your PC. Once you’ve done so, re-connect your USB memory drive. Now it should no longer be write protected and you should be able to format the drive by simply right-clicking on it and choosing Format.
However, if you are not able to find StorageDevicePolicies, you can always try to create a key by simply right-clicking in the white space located in the Control folder. You must choose New -> Key and then enter the name.
Once you do so, double-click the new key (folder) and then right-click again Make sure to choose New -> DWORD. You can name it WriteProtect and set its value to 0. Then click OK, close Regedit, and restart your PC.
If this method fails to work, try this one:
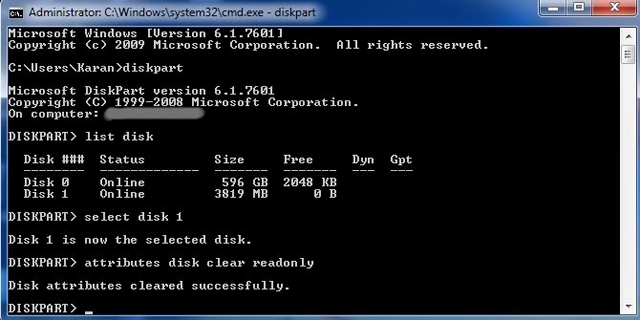
Remove write-protection by using Diskpart
Make sure to plug in your USB memory drive and launch a command prompt. You can do so by looking for cmd.exe in your Start menu (or, for Windows 8, the Start screen). If you are using Windows XP, you must click Start then Run and then type cmd.exe in the box.
Beware: you might need to run Cmd.exe using your administrator privileges. An “access is denied” message should pop up in this case.
To achieve that, you have to right-click on the shortcut and then select Run as administrator. For Windows 8, you simply have to choose the Command prompt (admin).
Once there, you must type the following:
- diskpart (then press Enter)
- list disk (then press Enter)
- select disk x (x is your USB memory drive’s number). You can use the capacity to figure out which one it is. (then press Enter)
- attributes disk clear read-only (then press Enter)
- clean (then press Enter)
- create partition primary (then press Enter)
- format fs=fat32 (then press Enter)
- exit